

How To Install Roll Out Cabinet Drawers
Instructions to Install a Coil Upwardly Door
Disclaimer: Safe IS OUR TOP PRIORITY
Warning: Installing Commercial doors might require technical skills we strongly suggest to hire an experienced technician to install these type of Doors. A rolling Door is a large object fabricated out of steel that works with assistance of Springs under tension and/or electric motors or chains. Springs,Motors or any big office of the door can crusade injuries or decease. For everyone'south safety please follow these instructions thoroughly.
Safety Warning:
Read the instructions advisedly earlier starting installation, If in that location are any questions about the product or any of the procedures to SAFELY install the door delight do non perform the work and instead contact a local door dealer or installer that is qualified to install these blazon of doors.
-Operate Door just when it is completely installed and adjusted and free of all obstructions such every bit ladders, tools etc..
- Doors are constantly under extreme spring tension, repairs, adjustments, installation and removal of springs and whatsoever related parts are dangerous if you are non familiar with the system.But qualified door installers should repair or perform any work on springs.
- Never let children to play or operate the door. Children can get caught between the door causing serious injury or decease. A roll upwardly door is a commercial/industrial equipment and should simply exist operated by Adults.
- Avoid walking through the doorway path while the door is in movement. If ane gets caught between the door and the floor, serious injury or death can occur.
- Avoid install the door when weather is agin or windy, once the curtain is unrolled the wind tin blow information technology inside or exterior causing serious injury or death.
-Should the door become hard to open up or go stuck, it is suggested to contact a qualified door agency or technician to correct the problem to prevent further damage to the equipment and door and to prevent injuries.
-To prevent injuries due to loose components on the door, cheque at least every i-2 months all of the bolt connections and moving parts. A visual inspection is the first step to prevent loose parts from falling on someone. Always make certain bolts are secured and tighten.
- To forestall injuries , never place your hand or fingers between the drapery and the guides while the door is in motility. Considering of gravity the door can travel fast and can hurt your hand.
- The intent of this didactics set up is to provide you with clear instructions on how to install a Roll u door on a new opening, If you have a tear out or take downward on the opening please consult your local door agency for assistance in removing the existing door.
- We advise to familiarize with your local codes in your region before starting work, some edifice codes vary by state and it is always recommended to check earlier yous purchase the door of before y'all install in order to avoid code violations.
-Nosotros highly suggest to wear personal protective Equipment (PPE) earlier starting installation of the door. Googles, gloves, hard hat and steel toe boots are a few of the suggested equipment gear to avert or preclude injuries.
-It is always beneficial to consider using a 2-person or larger coiffure for installing, adjusting and repairing doors specifically when the door is larger than 10′ wide. In addition information technology is as well recommended to employ the proper lifting equipment for the size of door you will install. If needed we tin provide you with the bodily weight of the door for you to consider the right equipment at install time.
This Guide main function is to assist the installer in correctly mounting doors with regards to condom, functioning and sound structure, Reference must be made to local and state building codes in your Surface area. We are happy to assist in finding out your needs based on your location.All of our doors follow the general educational activity contained herein. In addition all of the information and Instructions manual for your specific door (Burn Doors, Side folding etc..) are shipped together with the door. Also you can detect a list of parts and accessories that comes with each door.
Tools
The tools recommended for proper installation of each door volition vary from door to door and various door models. For instance if you have a Air current resistant door you might need thicker and longer expansion bolts (usually five" by five/16 diameter) every bit if you lot were installing a door that is not air current resistant (usually three" by i/four"). Depending how heavy your door is (insulated vs non insulated) yous might also need different hardware. The listing beneath is a listing for the well-nigh usually used tools.
- Electric drill with 3/8″ or 1/2″ chuck with nut driver bits.
- Masonry drill or touch on hammer and $.25.
- Chain hoist and sling for raising barrel and drape assembly.
- Scaffolding, Mechanical Lift, and/or Ladders (ladders non recommended for larger doors).
- Hammer.
- Channel Lock Pliers.
- Middle punch.
- Screwdrivers.
- Drills.
- Wrenches, vise grips, C-clamps, torque wrench, and a large pipe wrench.
- Plumb line, tape measure out, chalk line, and a h2o level.
Instructions on How to Safely Install a Whorl Up Door
STEP 1
Brand Certain All Parts Have Been Received.
If Parts are missing notify Industrial Door solution immediately.
Below is a listing of all the parts you need to install your door.

STEP 2
Rope and close the area where the door volition be installed. This will go along pedestrians away from the opening reducing potential injury to others. Also is always proficient to have a clear backroom to install the door comfortably.

Footstep 3
Read all instructions before starting the work. It is of import to familiarize with the instructions before yous start putting up your door.
STEP 4
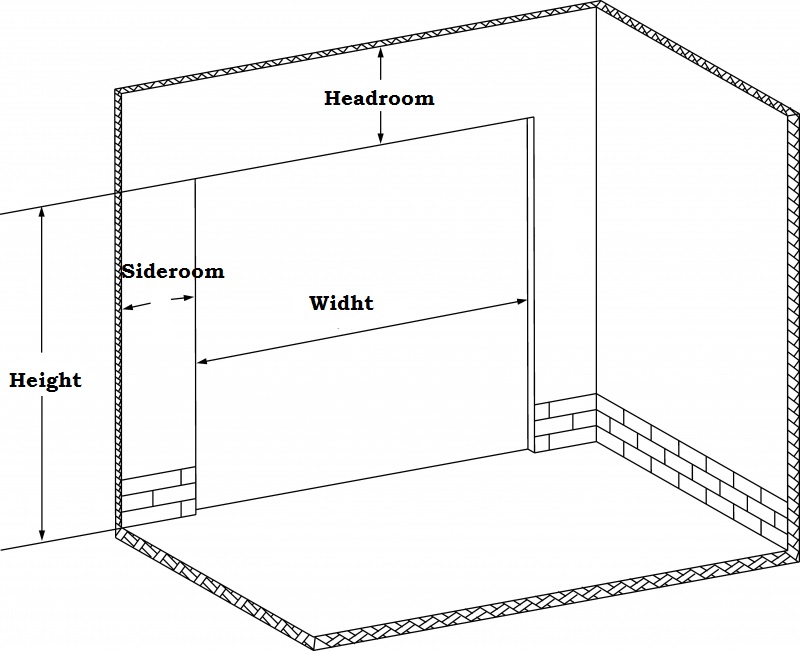
Make Sure the opening is the proper size. Utilise the image below to brand sure of the widht and height of the opening.
Note: When ordering a door the measurements below are disquisitional. Once the door is made it is made bigger to overlap the tiptop and width of the opening.
Cheque to see that sill is level. If sill is out of level, mark high sill level location on low side jamb.

STEP 5
Bank check both left and right wall surfaces, and surface at the caput (above opening) to define that all three surfaces are in line and no objects obstruct the proper installation of
A- Wall
B- Leap associates
C- The travel of the mantle
STEP 6
Information technology is very of import to know if the guides you received are suitable for the Jambs y'all take. Below is a diagram that shows the well-nigh mutual jambs applications.
Also if your door mounts between jamb instead of surface mount make sure the right guides were delivered to you.
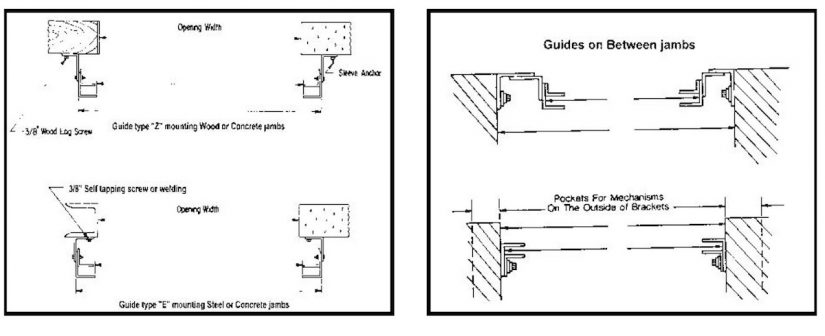
You tin also have a steel tube support condition and the mounting tin exist between jamb and face of tube. See beneath. This depends on how the door was ordered.
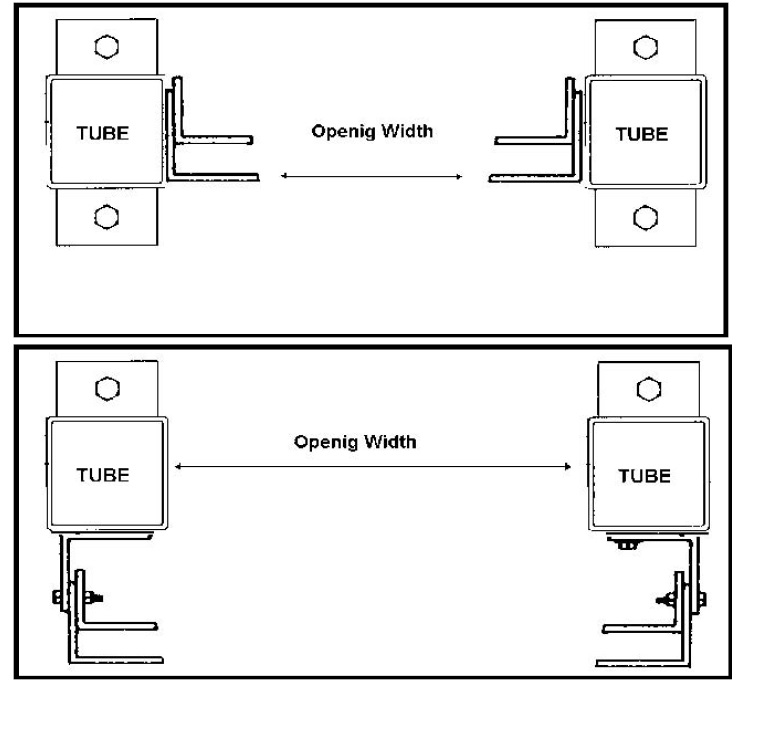
STEP vii
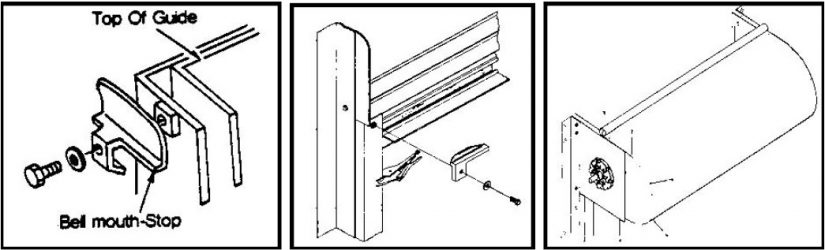
Verify that guides can be installed Plumb. Check the image below for reference. It is very important to take the top of both Guide angles to be leveled to each other.

Footstep 8
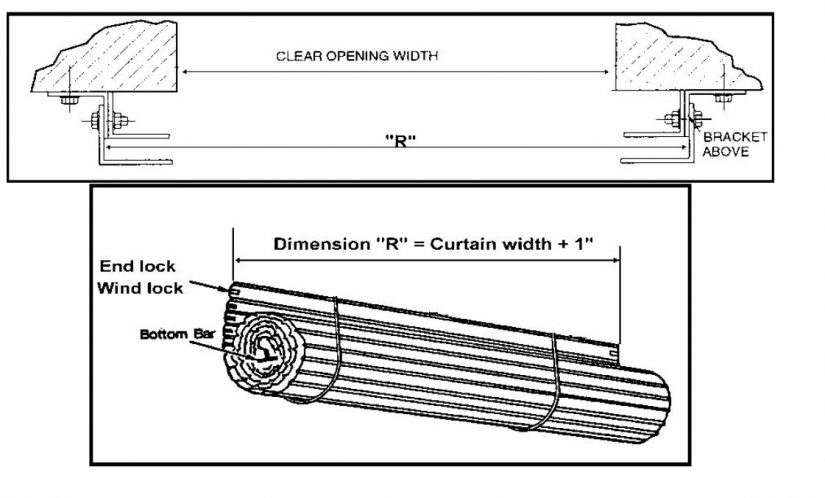
Locating Guide Assemblies.
Locate guide assemblies such that "R" Dimension exists between guides every bit shown. Bottom of guides MUST be on a level line and Guides MUST be plumb. We recommend 1" of play in total for smooth operation and travel of door through the guides.
STEP 9
Masonry Jambs
Hold "Z" guide, or wall angle ("East" guide) against wall and drill mounting holes thru the slots. Recheck"R"distance earlier proceeding. Install wall fasteners.

Step ten
Steel Jambs. (Spiral Attachment Option)
Agree "E" guide confronting steel jamb and mark the spot to exist drilled, or hold wall angle confronting steel jamb and drill holes thru the slots. Recheck"R"distance before proceeding. Install jamb fasteners.
Stride eleven
Steel Jambs.(Weld Attachment Selection)
Agree "E" guide against steel jamb and tack weld wall bending in place. Recheck"R"distance before proceeding. Weld using welding electrode. All welds must be good quality 3/16" fillet welds. Weld the bending to the steel jamb along the elevation of the angle. Important: When steel jamb does not extend in a higher place the opening, use three thru-bolts to fasten each wall bending to a higher place the opening.
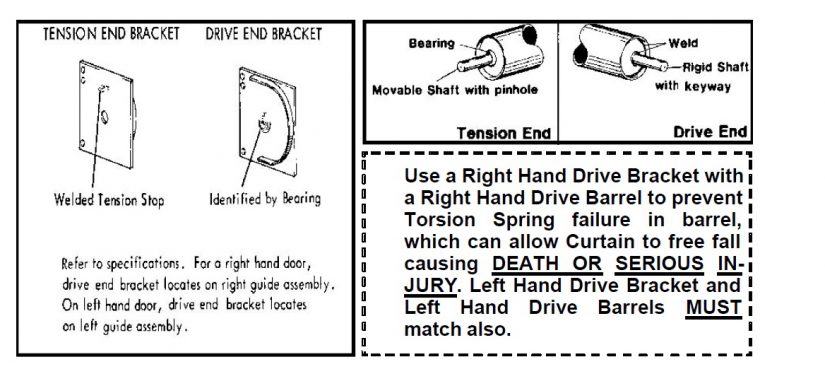
Footstep 12
Place Head Plate Bracket
Right Mitt Drive shown; Left Hand Bulldoze is opposite.
STEP 13
Identify Barrel Associates Drive End
Right Paw Drive shown; Left Paw Bulldoze opposite.
Pace 14
Orient Barrel and Headplate Brackets
Slide Bulldoze End of Barrel Assembly through Drive Bracket Bearing and Tension End through Tension Bracket. Secure Tension Wheel to Shaft using Pin or Cardinal.

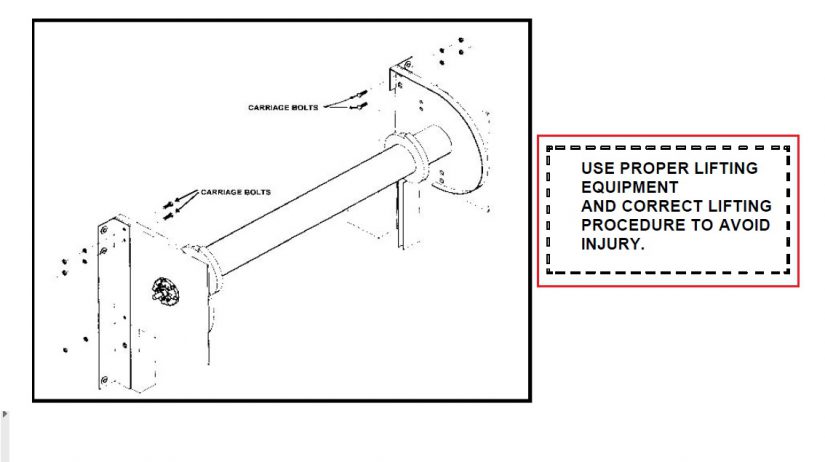
STEP 15
Elevator Brackets and Barrel and Commodities to Guide Wall Angles
With Forklift or Some Type of Lifting Device Raise Barrel and Brackets to Summit of Guides. Utilise Carriage Bolts to fasten Headplate Brackets to inside of Guide Wall Angles. Bolt heads are to be on within of Brackets. Brackets are to be square to Wall and parallel. Center Barrel betwixt brackets. Use a level to make sure Barrel Assembly is level.
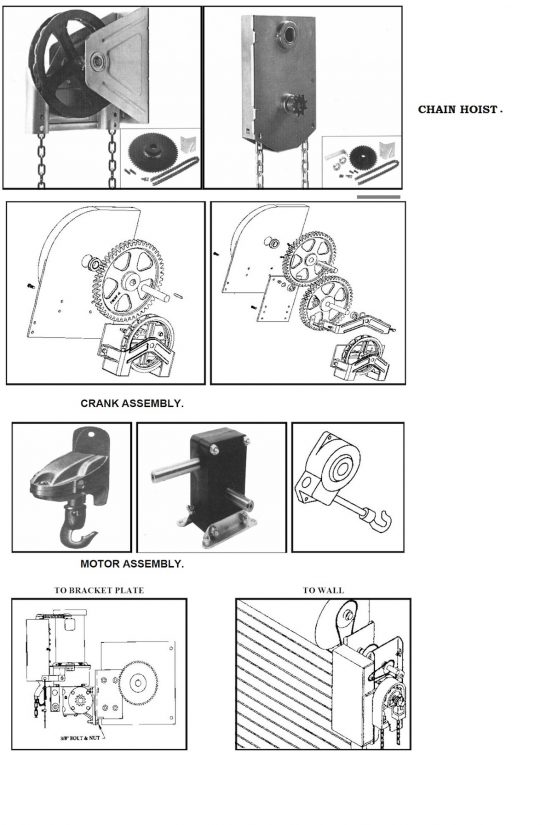
Footstep xvi
Drive Assembly
Cheque for the proper Drive Assembly. Chain Hoist, Crank, Motor.
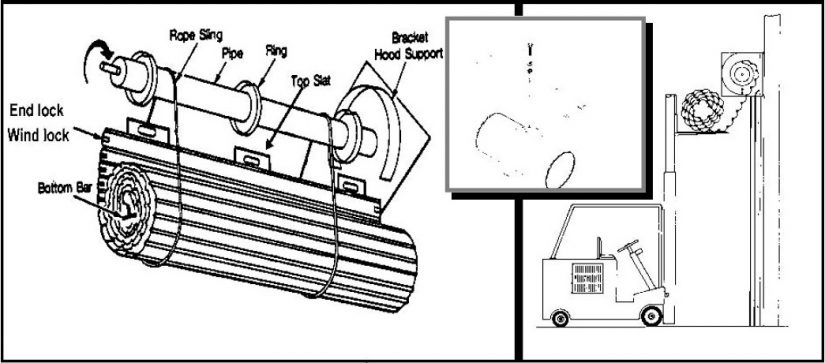
STEP 17
Installation of Drapery (Sling Method)
Hang the Curtain on two or more Slings or Heavy Ropes capable of suspending the curtain weight. Ropes/SlingsMUSTbe able to suspend the Curtain weight. Fasten the Peak Slat to the Slings or Ropes with wire. Rotate the Butt to bring the Elevation Slat in place. Center the Curtain betwixt the Headplate Brackets.If the Barrel Associates has Rings, pull the curtain up and agree the Top Slat against the Rings making certain Curtain is evenly centered on Barrel. Attach Top Slat to Rings with three/viii" Screws and Washers provided.Practise NOTstrip Screw Threads. If Barrel Associates has Studs, the Top Slat will have slots to attach to Butt. Hook Curtain over Studs and fasten with 5/sixteen" Circular Head Screws and Washers provided. If Slat Segments are provided at the Top of the Curtain, fasten them to Rings or Studs after Curtain is centered. Then crimp the Slat Ringlet adjacent to each Slat Segment.
The Sling Method causes less damage than rolling the Mantle onto the Counterbalance while it is on the flooring.
Complete Curtain Installation
Scroll Curtain completely onto Barrel. If Guides are Flared, then install the Middle Angle and Outside Guide Angles. Identify locking pliers on the Guides as shown.Lower Mantle into Guides.
Lock the Drive to prevent the Pall from falling.If the Guides are not flared, install Mantle StopBellmouth on Guides. A Stud is attached to the Guides to hold the Bellmouth. Be certain the back of the Bellmouth is flush against Headplate.
STEP 18
Applying Spring Tension.
Current of air Tension Cycle in the direction shown in figure.Alert this step can be extremely hazardous. Read and sympathize this department fully before proceeding. Applying spring tension requires two workers for rubber. you lot will demand (two) 1/2" to 5/8" steel rods two to three anxiety long (not provided) to apply tension to the springs. Slide i of the round bars into whatever of the holes of the tension wheel. Air current in the direction the pipe would rotate when the door is going upward (i.east. adjuster at left, clockwise, adjuster at correct, counter clockwise) slide the second round bar in the hole above hold and remove the lower bar. Echo the procedure until the curtain starts to coil around the spring assembly and stop when the bottom bar be comes visible. Line upwards the tension wheel stop with the bending stop and slide the finish round bar provided through stop angle and into the hole in the tension bike. Remove the adjusting bar.

Step 19
Installation of Drape
Place a pair of vise grips virtually 4" downwardly from top on both guide. Insert the ends of the bottom bar into the guide channels, and lower the curtain so that the bottom bar is approximately iv inches below terminate height until the bottom bar rest against the vise grips. Install the two cease bong mouth at front of the guides with the bolts and basics provided.
Pace 20
Suit Tension With Door in Fully Open Position.
Conform tension ane notch at a time to increment or decrease torque as required.
Footstep 21
Final Checkout. (to Be 'completed Before Installing Hood)
one. The Guides may be lubricated with a Paste Wax or Silicone Spray.
2. Verity thru entire travel of the door that the Endlocks or Windlocks on the end of the Drapery are not rubbing the Head plate Brackets.Operate door several times to check for problems.
3. Çheck that Lesser Bar is level in full downwardly and full upward position and that Mantle is not bounden against back of Guide.
4. If Drapery is level at bottom and not level at meridian, put Shims between Curtain and Counterbalance on the depression side.
Stride 22
Hood Installation
If Hood Supports are provided, snap a line across top of Head plate Brackets on the Wall. Measure length of Hood Sections and locate Hood Back up then that Hood Splice will fall on middle of Support.Attach Hood to Hood Bands on Bracket Plates (and to Supports if provided)
past drilling a 7/32" hole through Hood and Band. Then secure with one/iv" dia. x 3/8" long Self-borer Screws (v per Subclass and five per Support).
This is the last footstep to finish installation of a Traditional Rolling Steel Door with Bound assisted system. The springs are within the Barrel and work with the tension wheel on the outside of the head plate. The aforementioned instructions volition apply to Counter Shutters with Spring arrangement, Rolling Grilles with Springs and any other type of door that does have a spring system to operate except from Burn down Rated Rolling Doors.
Beneath you can find the Installation Instructions for Rolling Steel Doors with Band Spring or Italian Spring arrangement. The tracks method of installation is the curtain is besides the same likewise every bit the cover and head plates.The spring system is different. This Arrangement can work with Grilles and rolling doors. It is well-suited for places where side room is limited and a chain hoist is not an selection. Also Band leap do not have a tension wheel and many times come up fully sprung from the factory.

Footstep iInstall vertical guide runway with attached bracket plates as per spec dimensions.
STEP twoPut pipe into "5" cups, in housing brackets plates.
Pace 3Spin pipe until you lot run into fold of spring effectually cantankerous member of jump basket, fold should be downward, if reversed, take off and turn.
STEP ivSpin pipage again, and then pin at side of basket is facing downward. Bolt pipes to "V" cups.
STEP vSlide "Due south" hooks onto lead slats (as many every bit spring basket).
STEP half dozenRaise curtain an attached "S" hooks to cross fellow member of spring basket towards peak of basket.
Pace 7Pull down on curtain lightly in guild to release holding pin at side of handbasket. If pin does not release, pull out manually. (Make sure "S" volume is secure around cross member of basket).
STEP 8Let mantle wrap around basket and then insert into guides.
STEP 9Check tension, if more is needed, plough each bound box one complete revolution clockwise. If less is needed, do the opposite. If one is to much and simply half is needed, and then you must agree spring box with level or screw commuter to end jump from unwinding and change the "Due south" hook to another cantankerous member of the handbasket either upward or down. What ever aligning is fabricated to one basket, practise to all baskets. Practice non put "S" hook on cross members that accept the spring wrapped around information technology.
Footstep tenPut stops on guides.
Stride xiIt's a good idea if housing brackets are greased earlier hood is in stalled.

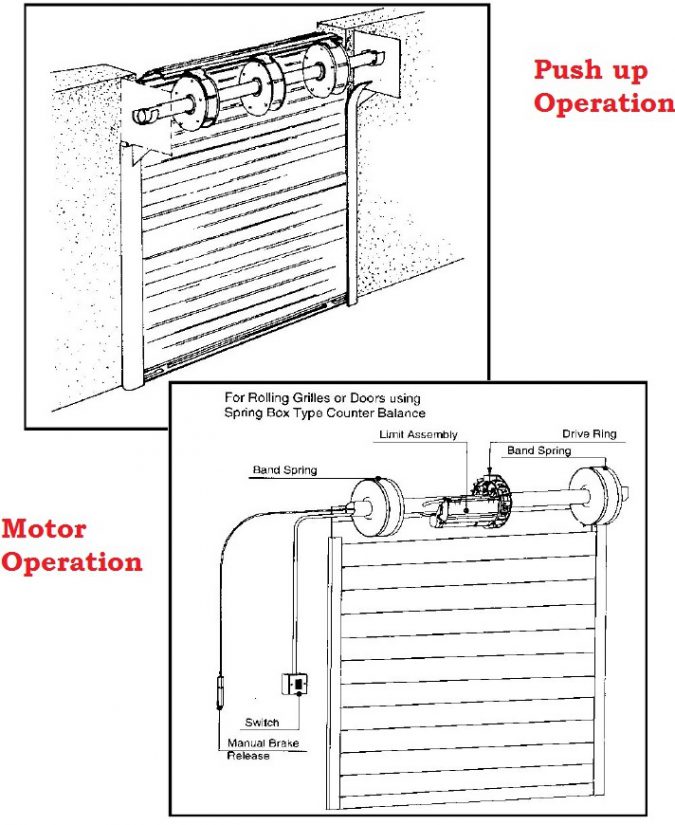
For Doors that come up with a Motor operator please refer to the Operation manual that comes with your door inside the Crate. When Installing a motor to your door at that place are a few things to keep in listen such as: Motor capacity (horse ability) Motor Voltage and high and depression voltage power connections.Electric codes vary from State to state, we recommend get-go to bank check with local say-so before commencing electrical work. It is suggested to rent or consult a licensed or skilled electrician in order to safety claw upwards the motor to the electrical outlet. Failure to do and so can result in damage to your Operator. For options and different motor applications please do non hesitate to contact us.
In add-on You can also check our video for visual reference of how to install a Roll up door. If at any time of installation you accept whatever questions please feel free to contact us to for technical back up. Nosotros manufacture our own doors and nosotros know them better than anyone else. If you have any problems delight feel free to contact us.

Source: https://www.industrialdoorsolution.com/rolling-doors/how-to-install-a-roll-up-door/
Posted by: elamquares.blogspot.com
0 Response to "How To Install Roll Out Cabinet Drawers"
Post a Comment