

How To Repair Wobbly Wood Patio Chairs
Fix a Wobbly Chair: Reglue a Wooden Chair
Updated: Jul. 10, 2022
How to disassemble a wobbly chair and reglue it

Knock a wobbly wooden chair apart, make clean upward the joints and so reglue and clamp it to make it solid and sound over again. It's an easy procedure if y'all follow our stride-past-step instructions.
Y'all might as well similar: TBD
Footstep one: Disassemble the wobbly chair
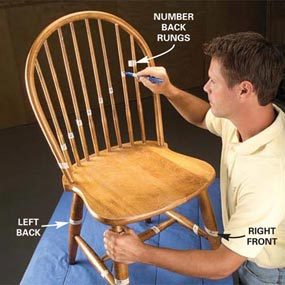
Photo one: Characterization the parts
Label all parts with masking record and a marker. Number the rungs in an ascending pattern. Mark left and correct as you face the forepart of the chair.

Photograph 2: Disassemble the back
Hold chair upright about i/2 in. off a padded workbench. Firmly strike seat downward, nearly each articulation, with a deadblow hammer.
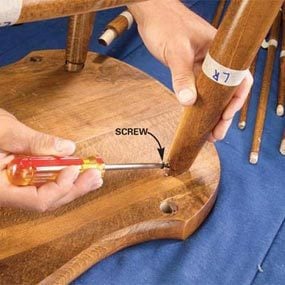
Photo 3: Remove screws and nails
Examine the legs closely and remove all screws and nails before hammering the legs apart. Save the screws for reassembly.

Photo 4: Dig out tough nails
File a groove in a apartment screwdriver blade to dig out securely driven nails. Repair the chisel damage later with matching wood filler.
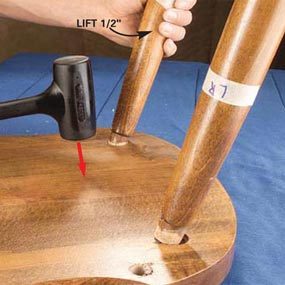
Photo v: Remove the legs
Concord chair upside down. Strike the seat firmly with a dead-accident hammer. Piece of work around the chair, slowly loosening each joint.
A wobbly wooden chair means one thing: Joints betwixt the legs and the rungs have broken free. Not just one—several. The only fix is to completely detach the legs and reglue them.
You'll save time and avoid frustration if yous label every office to arrive easier to put them dorsum together (Photograph 1). Use a uncomplicated numbering and lettering pattern on the rungs, with all numbers and letters facing forward. Left and right are determined equally you face up the front of the chair.
A deadblow hammer (from a home center; Photo ii) is a must for like shooting fish in a barrel chair disassembly. A rubber mallet bounces too much and a wooden mallet mars the surface. Some joints easily fly apart. Others reject to let loose. Always beginning hammering lightly and increase the force every bit needed. You'll clearly meet, and feel, the joint move when the glue bond breaks.
Many chair legs have screws holding them to the seat. Not all are obvious; wait for pocket-size spiral or nail holes filled to match the chair finish. Y'all're likely to fleck a rung when you miss a well-hidden nail or spiral. (Run into "Oops!" below). You may take to dig out small nails (Photo 4).
One time in a while the seat may carve up or crack apart. Simply this only adds an extra glue and clench step (plus 24 hours) earlier reassembly.
Oops!
If you miss a nail, yous'll probably split a rung when y'all knock the chair apart. Don't worry. This "disaster" is easily repaired. The harm is more than corrective than structural. Pull the nail with a locking pliers and then finish disassembling the chair. Relieve all wood chips for regluing and clamping later, at reassembly.
Stride ii: Reglue, assemble and clench the chair

Photo six: Scrape out erstwhile gum
Remove all traces of old glue from the mortise-and-tenon joints using sandpaper (100-grit) or a plumber's pipe-cleaning brush.

Photo 7: Apply new glue
Apply a light coating of yellow carpenter's glue to the seat and leg joints. Coat mortise holes using a small-scale brush. Reassemble chop-chop.
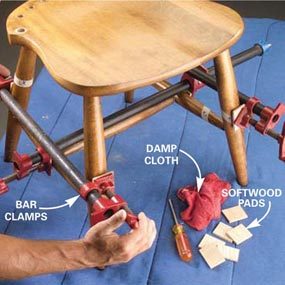
Photo eight: Clench the legs and seat
Clamp the legs, rungs and seat all at one time. Draw joints tight and wipe off gum drips with a clammy cloth. Check its alignment on a flat surface.

Photograph 9: Gum and clench the back
Apply glue to the back and spindle parts and get together. Align the back, positioning it with padded bar clamps. Let 24 hours to dry out.
One time in a while the seat may divide or cleft apart. But this just adds an extra mucilage and clamp step (plus 24 hours) before reassembly.
Your new mucilage won't bond with the old mucilage. Sand downwardly to bare wood to ensure a stiff bail and a solid joint that volition last (Photo 6). Our expert recommended a standard yellow carpenter'south gum. The key to reassembly is to piece of work quickly, because the glue begins to dry in a few minutes. Lay out seat and leg parts in a articulate order according to your labels.
We recommend using bar clamps because they have the power to draw stubborn joints together (Photo 9). Use every bit many as needed to pull all joints tightly together. When you're finished, your chair should sit down every bit solid as new.
Special trouble: Tighten a badly worn joint

Utilize epoxy
Make clean the sometime glue from the mortise and tenon. So fill up the mortise about halfway with epoxy. Set up chair leg (tenon) into mortise, align and clamp.
Some joints are just too damaged to allow for a tight glue articulation, peculiarly when repairing areas that accept broken several times. One way to save the chair is to employ 24-60 minutes epoxy as both a filler and a bonding amanuensis. Keep the joint upside down so the epoxy doesn't run out. Scrape off excess epoxy while it's however soft.
Special problem: Glue a split rung

Photograph 1: Employ glue to the split
Wedge open up a split rung with a wood wedge. Utilise carpenter'due south glue to split pieces using a small castor.

Photo two: Clamp the carve up
Clench the articulation using padded clamps. Remove backlog glue, starting time with a clammy cloth and then with a sharp chisel 20 minutes afterwards.
Split rungs can be repaired without disassembling the chair. Wedge open each split and apply ample gum to each carve up piece. Get glue every bit far down the split equally possible without actually splitting the rung further.
Deeply clamp the repair with padded clamps. Tighten until the glue oozes out and the split edges realign and pull tight. But don't creepo down too hard and squeeze all the glue out of the joint. Clean up excess glue with a clammy cloth merely don't get moisture into joint. Wait most xx minutes until the backlog glue looks similar soft licorice, then elevator information technology off by gently scraping with a chisel or utility knife. For a completely invisible fix, yous'll have to sand the area with fine sandpaper, colour-match the stain and revarnish.
Required Tools for this Project
Have the necessary tools for this DIY project lined upwards earlier you start—you lot'll save time and frustration.
Required Materials for this Project
Avert concluding-minute shopping trips by having all your materials set ahead of time. Here's a listing.
Originally Published: June twenty, 2022

How To Repair Wobbly Wood Patio Chairs,
Source: https://www.familyhandyman.com/project/fix-a-wobbly-chair-reglue-a-wooden-chair/
Posted by: elamquares.blogspot.com
0 Response to "How To Repair Wobbly Wood Patio Chairs"
Post a Comment